When working in groups, it’s critical to communicate information both accurately and quickly. Here, Google Sheets provides the finest platform to notify multiple users of any updates or changes. The best part of Google Sheets is it not only shares a file but also notifies the user about it. It allows you to grant different levels of permissions to people, effectively controlling who can edit your data. Thus, it makes sharing and collaboration quite simple.
A Sample of Practice Spreadsheet
You can copy the spreadsheet that we’ve used to prepare this article.
3 Ideal Examples to Notify Multiple Users in Google Sheets
Three situations are most often present whenever it needs to notify multiple users in Google Sheets. We’ll go over each scenario in detail in this article.
1. Sharing Files with Multiple Users
Google designed a working environment to support organizational collaboration with its sharing-friendly Google Drive. Spreadsheet sharing became incredibly simple, allowing coworkers to participate whenever they wanted.
Steps:
- Google Sheets has a box with the label “Share” in the upper right corner. Simply click it.
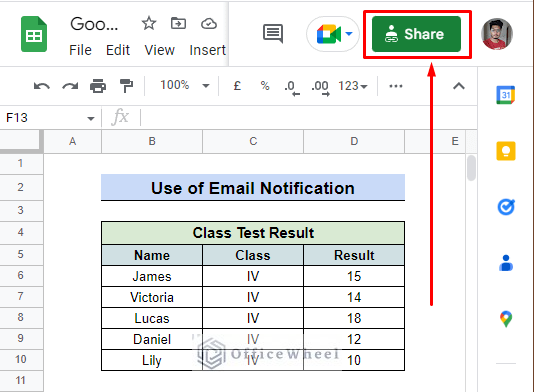
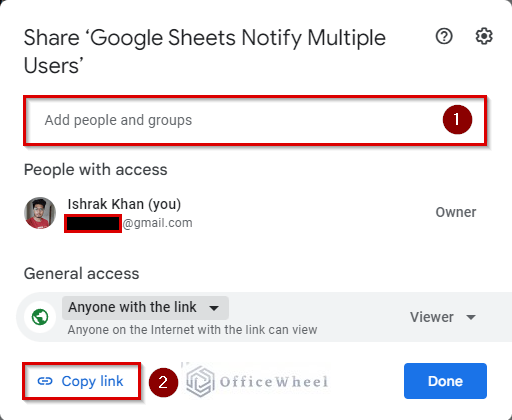
- You’ll receive a box that looks something like the image below. In reality, there are two ways to distribute the spreadsheet
- You can type the names or emails of the people you want to share with directly.
- You can send them the link immediately by using the underlined “Copy link“
This article will walk you through each feature and level of access that Google Sheets provides to its users. Start with the first possibility.
Read More: How to Send Email Based on Date in Google Sheets (2 Methods)
I. Add People and Groups
The simplest way to distribute a spreadsheet is through this method. It has some fantastic degree of access features in addition to notifying the user. A detailed explanation of this procedure is provided below for the convenience of readers.
Steps:
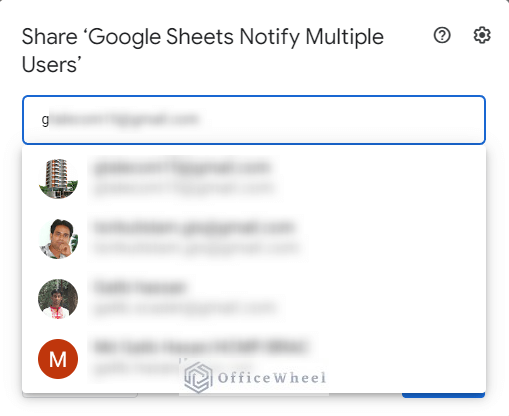
- It will automatically begin recommending names or emails related to the word or letter as you begin typing it in the field. For instance, when we typed “g” in this instance, a list of possible users surfaced.
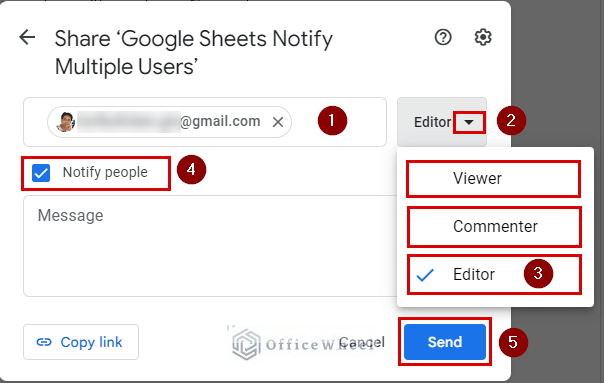
- The following box will appear after choosing the user.
- You can choose this access level of the user by selecting the Editor option with a downward pointing arrow. Three different access levels exist:
- Viewer: It will only permit downloading, copying, and printing of the sheets for the user.
- Commenters: They enjoy the same amount of access as viewers. They may, however, make comments as needed.
- Editor: It gives the user complete access to the spreadsheet, just as its owner does.
- Do not forget to select “✔” next to Notify People.
- Finally, press Send to finish the procedure.
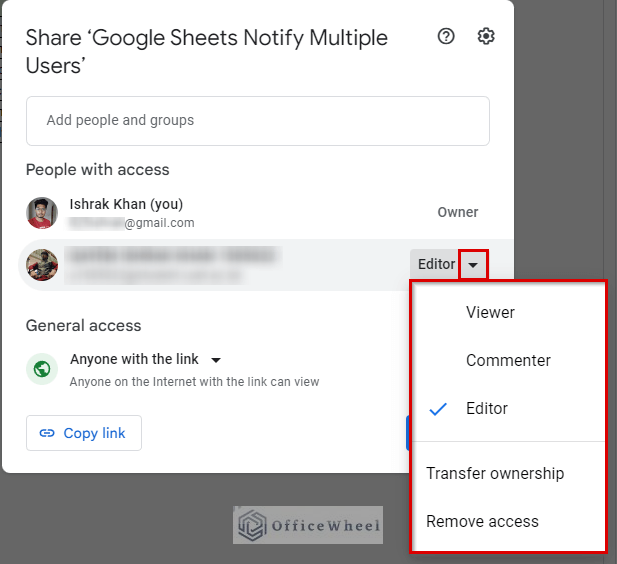
- The box will vanish once you’re done. To discover who else has access to this spreadsheet, you can click the Share option from the toolbar once again.
- As seen in the figure below, a similar box will thereafter appear. The owner is listed first in this section under “People with access,” followed by other users. By clicking the down arrow next to the Editor option, you may once again change the access level of the user. However, in addition to the prior access level, there are two more choices:
- Transfer ownership: Sometimes it’s necessary to alter the ownership. Google Sheets provides this access level, as a result, to address this issue and allow owners to change without losing data.
- Remove access: If the owner deems a user’s access to be troublesome, that is the best course of action to take.
Read More: How to Set Up Custom Notifications in Google Sheets (2 Ways)
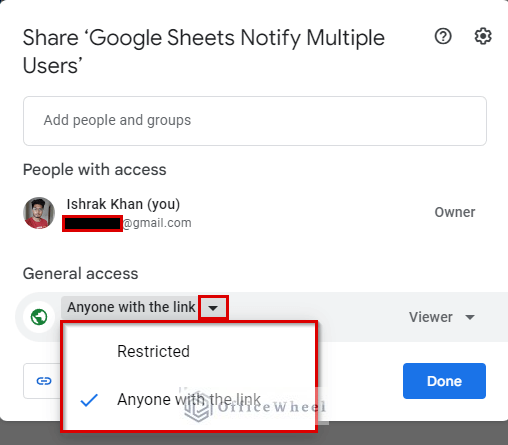
II. General Access
It gives everyone access to the spreadsheet. You can select whether your spreadsheet should be made publicly accessible or just accessible to those with specific permissions. Anyone can visit the link and open the sheets if you provide access to everyone.
Steps:
- Once again, if you click the down arrow beside the Anyone with the link, You will find two options available in this section:
- Restricted: The choices limit who can access the link. The URL will be inaccessible to some people. To view the sheets, they will have to ask for permission first.
- Anyone with the link: Anyone can access the URL with this permission; they can even download, copy, and share it with others.
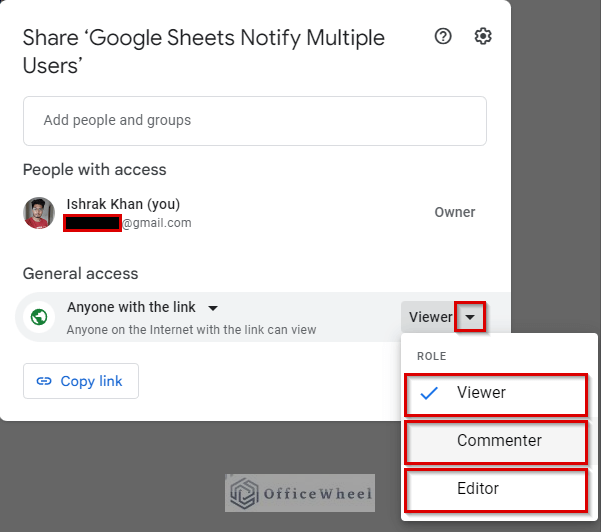
- Google Sheets, however, offers a fantastic feature for general accessibility. Simply by selecting the down arrow next to the viewer on the left, the owner can also limit their accessibility.
- It provides three positions that are equivalent to the first three access levels, namely Viewer, Commenter, and Editor.
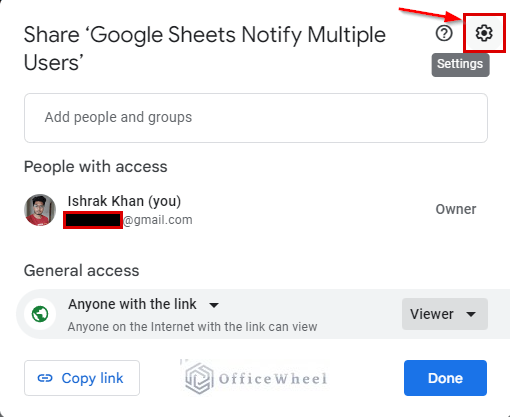
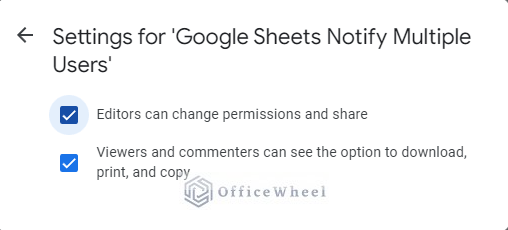
- At the top left corner, there is a setting option as well. To change the functions of the roles specified in Google Sheets, click it.
- By default, each box has a checkmark. However, the user has the option to uncheck these to further lower the access level.
Read More: How to Enable Email Notification in Google Sheets (Step-by-Step)
2. Setting File Edit Notifications
This article is only about how to use google sheets email notifications to notify multiple users. There are not many steps to take. You must first set up Google Sheets email notifications before informing other users.
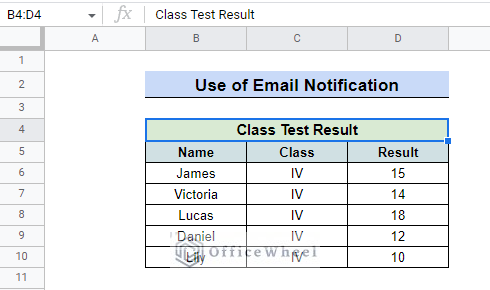
Consider that you are a teacher and that you have the test scores of your five students. You want to let them know. However, you must first establish the notification rules. Below are the steps and descriptions.
Steps:
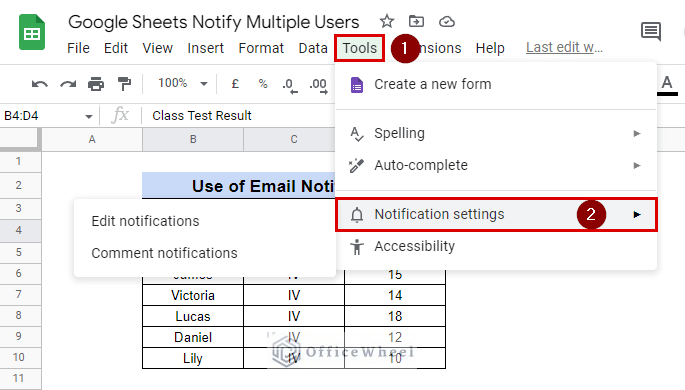
- From the toolbar, select Tools.
- Choose Notification Settings from the window that will open up below the word Tools.
- There are two options available: Edit notifications and Comment Notifications. (Check below for each description)
- The following box will appear after clicking Edit Notifications. You will find yourself with the following options in the red-marked box. Brief explanations of what these terms mean are provided below.
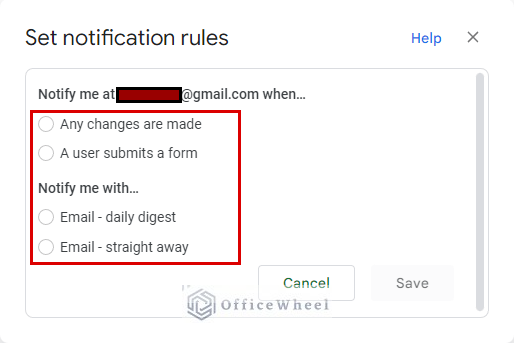
I. Any Changes Are Made
Every change made to the spreadsheet is tracked when you select this option, and an email is sent after each modification. This can be done instantaneously or via a daily digest in Google Sheets.
II. A User Submits a Form
This choice can alert you each time a team member submits a form. Google Forms can be used to link forms to the spreadsheet. Surveys or a university admissions form fall within this category.
III. Email – Daily Digest
You can choose this if you want to receive the list of changes made by users at the end of the day or at a specific time. This is excellent for users who do not wish to immediately be informed of changes. You will receive notifications after the changes have been made.
IV. Email – Right Away
If you choose this option, an email will be sent to you each time your spreadsheet is modified. This is excellent for users who handle sensitive data and want to be notified whenever a change is made.
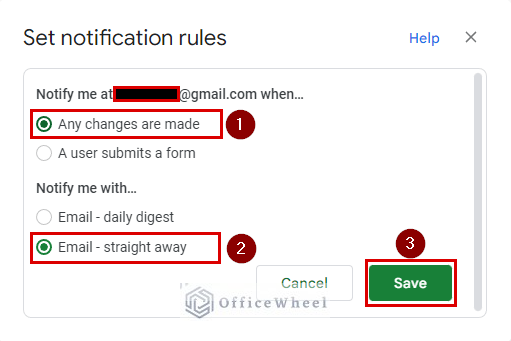
Assume that you chose the following choices for the aforementioned situation.
- Notify me at [email protected] > Any changes are made
- Notify me with… > Email-straight away
- Next, select Save.
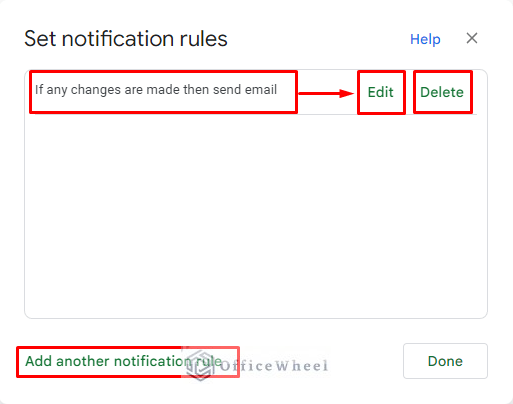
- Afterward, a window looking like the one below will appear.
- This establishes the first rule. At any time, you have the option to Edit or Delete it.
- Simply click “Add another notification rule” to add other rules.
- To make the rules effective, press Done.
3. Modifying Comment Notifications
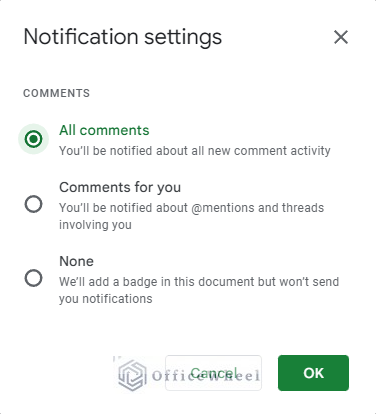
You can change comment notifications using this option. If you click Comment Notifications, the following window will arrive. Here, you will find three options that will notify you whenever a user makes a comment. They are as follows:
- All Comments: You will receive notifications of every comment posted on Google Sheets.
- Comments for you: This function only alerts you to comments that include your name. It is ideal for dealing with large amounts of data since, if you check your emails, you will locate them right away and be up to date on your task.
- None: If you choose this option, you won’t receive any emails about comments made in Google Sheets.
Read More: How to Receive Notifications of Changes in Google Sheets
Final Words
These are the situations that we encounter the most often while using Google Sheets to share and notify others. Hope you find this article helpful. If you have any thoughts or questions about notifying multiple users in Google Sheets, please let us know. For additional information, visit OfficeWheel, our website.
Great post! I’m looking for a way to use google sheets email notifications to notify multiple people when edits are made to the sheet. The method you described above only informs the person who made the sheet – but I don’t see a method how to notify other people. Please let us know! Thank you
Hello Alan,


Thanks for your query. I understand that you want to notify a group of people using Email notifications when any edit is made to your Google Sheets. We can accomplish this using an Apps Script code and setting a Google Sheets On Edit trigger.
Consider the following spreadsheet with multiple worksheets. To enter the Apps Script code in this spreadsheet, click the Extensions tab and select the Apps Script command.
As a result, a new tab like the following will appear in your browser.
Enter a project name >> replace the default function with the following code >> click the Save button >> click the Trigger command from the left-side pane.
function onEdit(e){
  var ss = SpreadsheetApp.getActiveSpreadsheet();
  var ws =ss.getActiveSheet();

  var range = e.range;
  var oldValue = e.oldValue;
  var newValue = ss.getActiveCell().getValue();

  if (oldValue === "" && newValue === ""){
    return;
  }

  if (oldValue === newValue){
    return;
  }

  var cellAddress = ws.getActiveCell().getA1Notation();
  var editor = Session.getActiveUser().getEmail();

  var recipient = "[email protected], [email protected]";
  var sub = "Cell Modification";
  var body = "Modified Spreadsheet: " + ss.getName() + "\nModified Sheet: "+ ws.getSheetName() + "\nEdited Cell: " + cellAddress + "\nEdited by: " + editor + "\nPrevious Value: " + oldValue + "\nCurrent Value: "+ newValue;

  MailApp.sendEmail(
    recipient,
    sub,
    body
  );
}
Consequently, you will get the Trigger options. Click on the Add Trigger button.


This will open the Add Trigger dialog box. Set the Choose which function to run option to OnEdit (i.e. your current function) >> set the Select the event source option to From spreadsheet >> set the Select event type option to On edit >> set the Failure notification settings option to Notify me immediately >> click the Save button.
Click the Editor command from the left-side pane and then click the Run button from the editor.
Note:
1) When you run the code for the first time, you must review permissions for authorizing Google Sheets to use your Google Account to run this script.
2) You may get an error message when you run the above code. This is normal as you have run the script but no change hasn’t occurred to your spreadsheet. When any change occurs in your spreadsheet, this script will run automatically from now on.
Now, make any changes to your spreadsheet. In the Research Data worksheet, I have changed Cell F7’s value from Planning to Completed.
As a result, each person whose email address was included in the Apps Script code will receive an email like the following:
And that’s how you can send email notifications to multiple people for any edit in your worksheet. Let us know your feedback on the solution. The Google Sheets used for this solution is linked below:
Google Sheets Notify Multiple Users Using Apps Script
Regards,
Seemanto Saha
OfficeWheel