In this tutorial, we will look at how we can apply an automatic timestamp in Google Sheets using Apps Script. But first, let’s start with the basics.
What is Apps Script and why do we need it?
Google Sheets provides us with many built-in options to input or generate timestamps automatically. These usually come in the form of keyboard shortcuts or a combination of functions.
However, these features have limitations to make them user-friendly. And sometimes these options just don’t satisfy the user’s needs completely.
For that, we have Google Apps Script.
Apps Script is a browser-based console that allows the user to create their own functions according to their specific need. It is often used for highly complex calculations and to overcome difficult conditions.
In this article, we will take advantage of this customizability and generate timestamps as cells are updated in Google Sheets.
Accessing Apps Script from a Google Sheets Spreadsheet
Over the years, Google Sheets has gone through a lot of updates. Not only did it add new functions, but also improved on its accessibility and ease of use to its existing features. And Apps Script, previously known as Script editor, had welcome improvements.
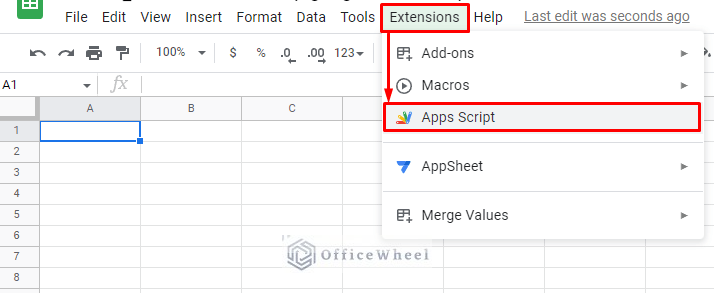
Now, we can find the Apps Script option under the Extensions tab:
Clicking on the option will take to a separate browser tab with the Apps Script console:
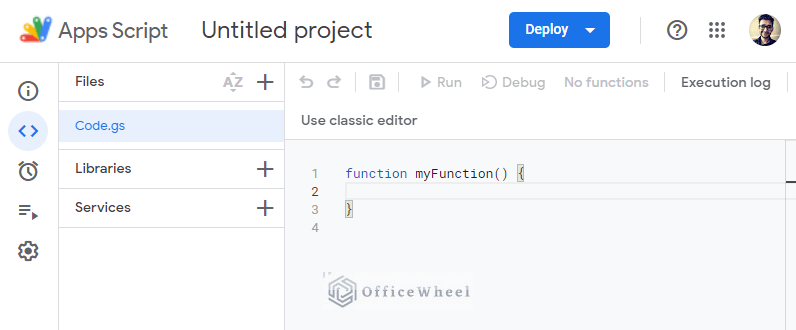
A lot of UI improvements have been made and working with the console is a breeze.
How to Apply an Automatic Timestamp Using Google Sheets Apps Script
1. Generate Adjacent Timestamps to Entered Value in Google Sheets
Let’s begin with something simple. We want to generate a timestamp automatically adjacent to an updated cell in Google Sheets.
Simply put, every time we enter a new value in column A, column B should generate a timestamp at presenting the date and time of the new entry.
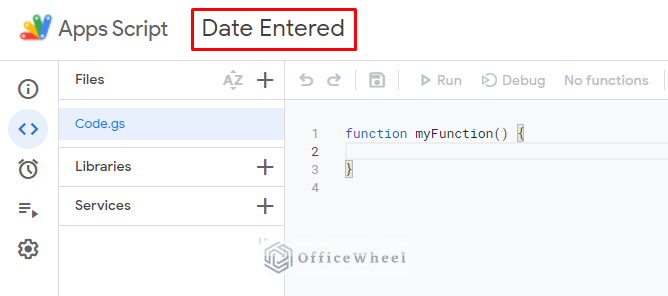
Step 1: Open Apps Script and name the project. We have named it ‘Date Entered’.
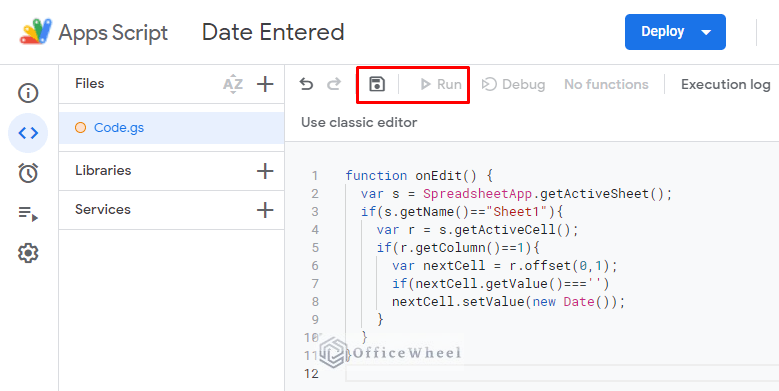
Step 2: Enter the following script:
function onEdit() {
  var s = SpreadsheetApp.getActiveSheet();
  if(s.getName()=="Sheet1"){
    var r = s.getActiveCell();
    if(r.getColumn()==1){
      var nextCell = r.offset(0,1);
      if(nextCell.getValue()==='')
      nextCell.setValue(new Date());
    }
  }
}
Step 3: Click Save project and then Run to apply and execute the script. If Google asks for permission, allow it.
Step 4: Type in random data in column A to automatically generate the data entry timestamp in the corresponding cell in column B.

Don’t worry if the timestamp only shows dates. Simply update the cell format to show date and time values from the toolbar.
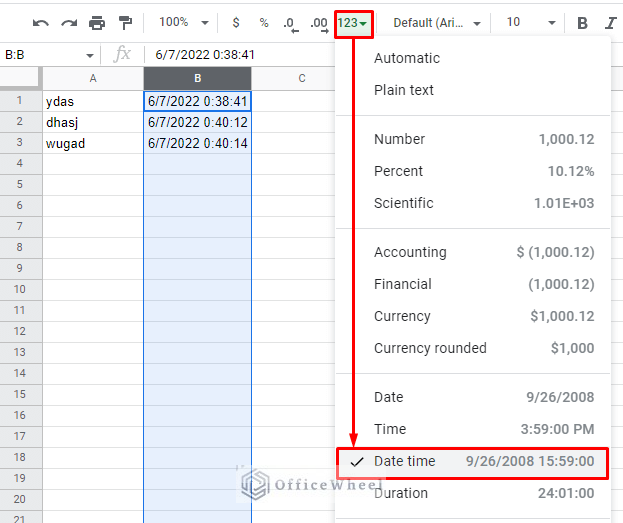
See Also: How to Format Date in Google Sheets (3 Easy Ways)
Script Breakdown
We will mostly focus on explaining the conditional statements of the script.
- onEdit function: This is the core function of the script. What it does is that it triggers every time an edit occurs in the active worksheet. As you will notice later in this article, all methods discussed here use this function.
- if(s.getName()==”Sheet1″) in Line 3: The IF statement uses only the worksheet of the exact name. No other worksheet will be affected by the conditions within this statement.
- if(r.getColumn()==1) in Line 5: This IF statement will make the function only look for changes in column 1, or column A.
- var nextCell = r.offset(0,1) and if(nextCell.getValue()===”) in lines 6 and 7: Makes the function move to the adjacent cell where the IF statement will be applied. The IF statement will only work if the adjacent cell is empty. This sets up a condition that the timestamp will not update if the cell already has an existing timestamp.
And the rest is just about generating the Date and Time with the DATE() function.
As you can see, this is but a simple automatic timestamp generation with the Google Sheets App script. The next methods will work on building up from this base into something more presentable.
2. Apply ‘Last Modified’ Timestamp in Google Sheets
The best use of an automatic timestamp will definitely be for using it as a ‘Last Modified’ data in Google Sheets. This data is often used to keep track of any changes made within respective columns.
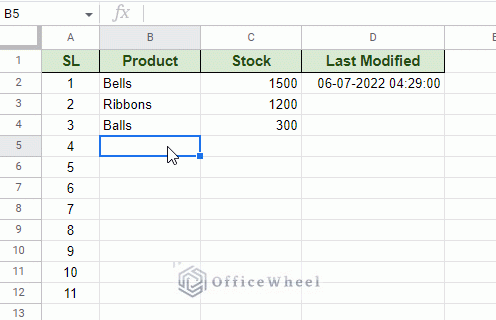
We have a dataset created called ‘Data’:
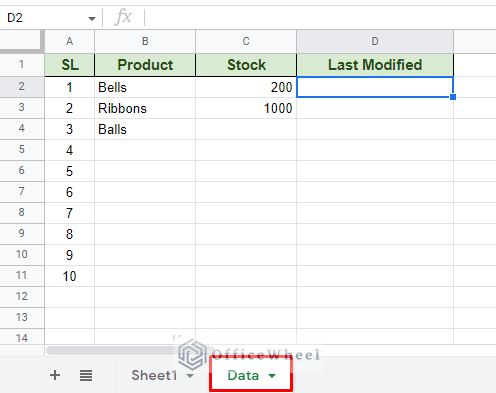
We want to automatically generate a timestamp every time the Stock column is updated only. So, what we have to do here is limit our script activation to only column C. And we will also try to keep the headers out of the equation.
Let’s see the steps.
Step 1: Open the Apps Script window. Don’t forget to name your project.
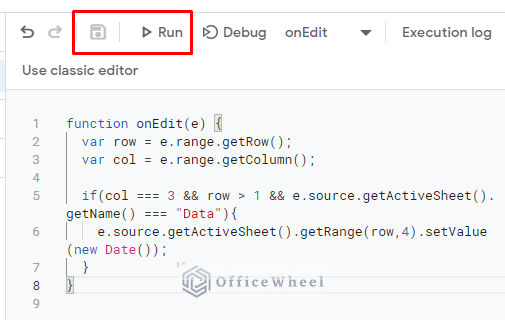
Step 2: Apply the following script:
function onEdit(e) {
  var row = e.range.getRow();
  var col = e.range.getColumn();

  if(col === 3 && row > 1 && e.source.getActiveSheet().getName() === "Data"){
    e.source.getActiveSheet().getRange(row,4).setValue(new Date());
  }
}
Step 3: Click Save project and Run to apply and execute.
The result:
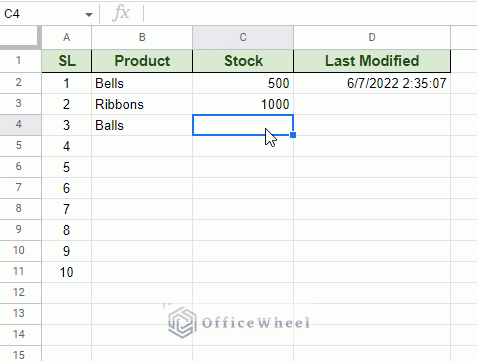
As you can see, only changes to the Stock column updates the Last Modified timestamp.
Script Breakdown
- We once again use the onEdit function, but this time, we have a return object in the form of ‘e’.
- The return object is used to return the row and column values as we can see in lines 2 and 3.
- In the IF statement, we have three conditions:
- col === 3: Makes sure that the function only works when changes are made in column 3 or column C.
- row > 1: Makes the function ignore the headers of the dataset. The headers are in the first row.
- e.source.getActiveSheet().getName() === “Data”: Implements the function in only the worksheet named Data.
- The last line generates the current date value using Date() function
Adding the Date Entered Column
We can take whatever we’ve learned in the first and previous approach and create ourselves a Date Entered column.
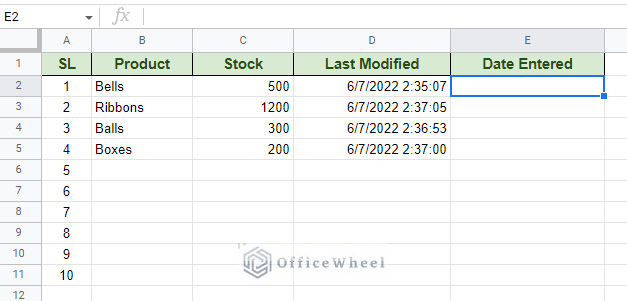
What this column will hold is the date and time of the first modification or data entry that occurred in the Stock column. The value won’t change with subsequent updates.
We will build on our existing script made for the Last Modified column. The script is similar to that as well.
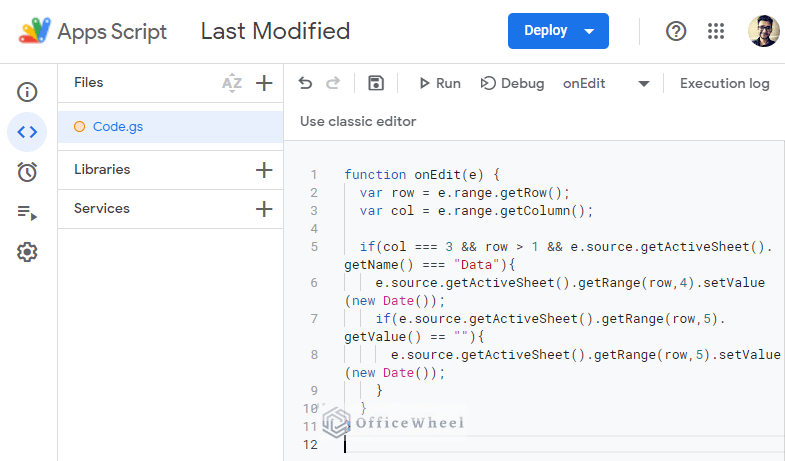
The updated script to accommodate Date Entered values:
function onEdit(e) {
  var row = e.range.getRow();
  var col = e.range.getColumn();

  if(col === 3 && row > 1 && e.source.getActiveSheet().getName() === "Data"){
    e.source.getActiveSheet().getRange(row,4).setValue(new Date());
    if(e.source.getActiveSheet().getRange(row,5).getValue() == ""){
      e.source.getActiveSheet().getRange(row,5).setValue(new Date());
    }
  }
}
The script in action:

What we have added is only the following IF statement inside the previous IF statement:
if(e.source.getActiveSheet().getRange(row,5).getValue() == ""){
  e.source.getActiveSheet().getRange(row,5).setValue(new Date());
}
What it does is: if column 5, or column E, is blank, the function will update the corresponding cell with the current date. No further updates will occur.
More approaches to this problem: Autofill Date when a Cell is Updated in Google Sheets (3 Easy Ways)
3. Apply Timestamp by Column/Header Name
Any sensible dataset will always have a proper header name regardless of how many columns it uses. And it is also quite common to have unique header names, making them easy to locate, again regardless of column number.
Thus, in this section, we will look at how to apply an automatic timestamp in Google Sheets using the header/column name.
Step 1: Write a function to get the column number from the column name.
We begin with a simple script to search the active or given worksheet to find the column/header name that we want to update.
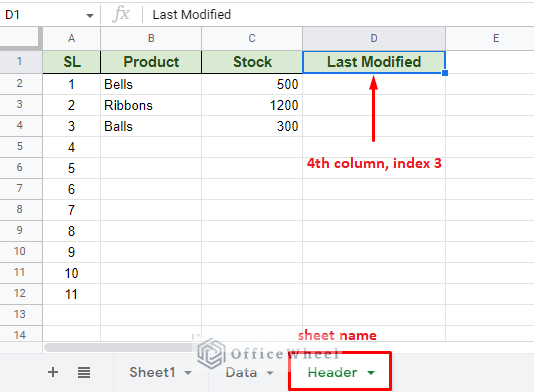
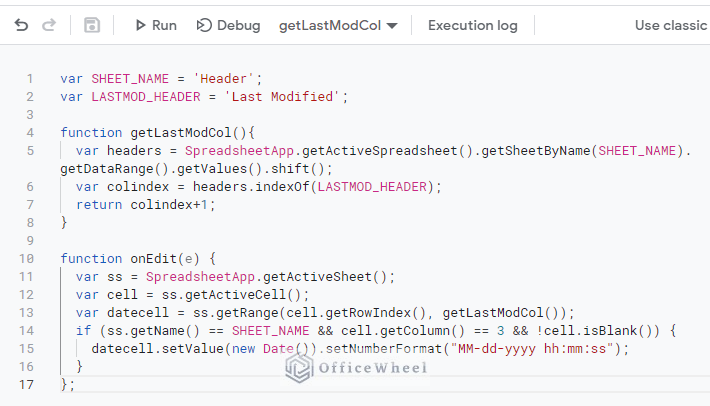
var SHEET_NAME = 'Header';
var LASTMOD_HEADER = 'Last Modified';

function getLastModCol(){
  var headers = SpreadsheetApp.getActiveSpreadsheet().getSheetByName(SHEET_NAME).getDataRange().getValues().shift();
  var colindex = headers.indexOf(LASTMOD_HEADER);
  return colindex+1;
}
We search for the column header, Last Modified, and return the column number with the getLastModCol() function.
By default, the column index returned will be 3 since the index starts from 0.
So, we add 1 to the colindex variable.
Step 2: Set the trigger function. Of course, it is the onEdit function.
function onEdit(e) {
  var ss = SpreadsheetApp.getActiveSheet();
  var cell = ss.getActiveCell();
  var datecell = ss.getRange(cell.getRowIndex(), getLastModCol());
  if (ss.getName() == SHEET_NAME && cell.getColumn() == 3 && !cell.isBlank()) {
    datecell.setValue(new Date()).setNumberFormat("MM-dd-yyyy hh:mm:ss");
  }
};
The biggest change from the last onEdit function is that we have added a date-time format to the Date() function. It is the MM-dd-yyyy hh:mm:ss. You can also use MM-dd-yyyy hh:mm:ss A/P to present the time in the 12-hour format.
This addition makes the combined final script:
var SHEET_NAME = 'Header';
var LASTMOD_HEADER = 'Last Modified';

function getLastModCol(){
  var headers = SpreadsheetApp.getActiveSpreadsheet().getSheetByName(SHEET_NAME).getDataRange().getValues().shift();
  var colindex = headers.indexOf(LASTMOD_HEADER);
  return colindex+1;
}

function onEdit(e) {
  var ss = SpreadsheetApp.getActiveSheet();
  var cell = ss.getActiveCell();
  var datecell = ss.getRange(cell.getRowIndex(), getLastModCol());
  if (ss.getName() == SHEET_NAME && cell.getColumn() == 3 && !cell.isBlank()) {
    datecell.setValue(new Date()).setNumberFormat("MM-dd-yyyy hh:mm:ss");
  }
};
Step 3: Click Save project and Run to execute.
Final Words
Applying an automatic timestamp using Google Sheets Apps Script is one of the many uses that the feature can implement. Even with this simple topic, we have seen the different customizations we can make to suit our needs. We hope that you’ve found our examples helpful and are ready to take full control of what Apps Script has to offer.
Feel free to leave any queries or advice you might have for us in the comments section below.