This article looks to serve as a comprehensive guide discussing all the ways we can use to autofill a date in Google Sheets, starting from simple built-in features down to user created functions.
Let’s get started.
3 Ways to Autofill Date in Google Sheets
1. Autofill Dates Using the Fill Handle in Google Sheets
Unlike Excel, Google Sheets doesn’t have a Fill series command on its Toolbar. But it does have quite the intelligent autofill feature, which comes in the form of the Fill Handle.
Google Sheets can easily and efficiently differentiate between the different values that come with a date. We are of course talking about Days, Months, and Years. On top of that, the application is also quite efficient when it comes to working with series and sequences.
By combining these two features, we can easily autofill a sequence of dates in Google Sheets.
Autofill a Day Sequence in Google Sheets
By default, using the fill handle on a date generates a series of dates that are one day apart. Let’s see how it’s done first, then we move to the explanation.
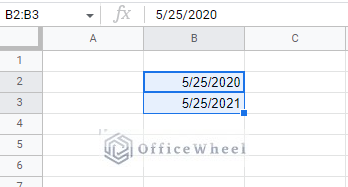
Step 1: Input or select a date in the worksheet. You will notice a blue square at the bottom-left corner of the active cell.
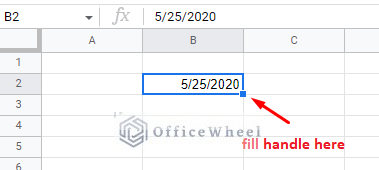
Moving your mouse cursor to the square will transform the cursor to a plus (+) symbol. This is the Fill Handle symbol/cursor.
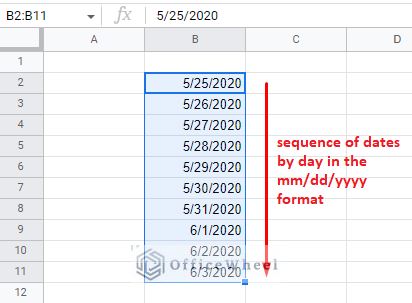
Step 2: Click and drag the fill handle down the column to generate a sequence of dates.
Notice that the center value is increasing by 1 in each row. Since our date is in the mm/dd/yyyy format, it is the day value that is increasing.
We have successfully auto filled a sequence of dates by day in Google Sheets.
Explanation:
Google Sheets values each date as integers. We can see that if we use the DATEVALUE function.
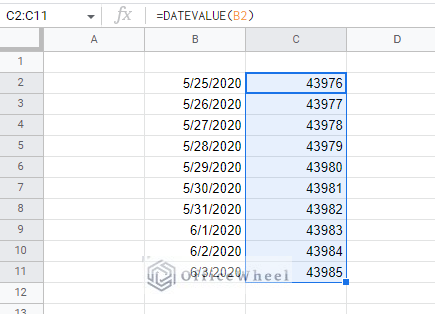
Using the fill handle increases the value of these integers by 1 in each row, which subsequently increases the number of days by 1.
Autofill by Weeks (Or Any Day Interval of Days) in Google Sheets
We’ve already mentioned that Google Sheets is intelligent when it comes to sequences. And to create or autofill dates in intervals beyond the traditional per day increment, we need to create a progressive series.
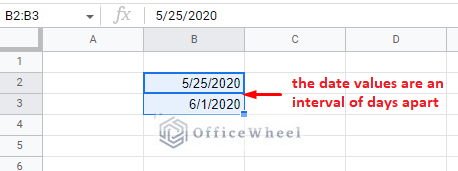
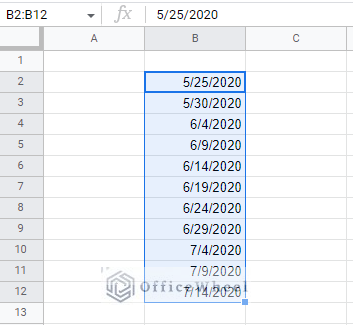
Let’s see how we can do that by creating a sequence of dates with the fill handle that are a week (7 days) apart.
Step 1: The first and most important requirement to allow Google Sheets to recognize a series is to input the first two values of the sequence. Since we want a weekly date sequence, the second date will have an added 7 days to it:
Step 2: Select the two values and click and drag the fill handle that is under the second value.

As you can see, the increment of date is weekly.
The same idea can be applied for any interval of days: simply input the first two dates of the series and use the fill handle.
Here is the result of auto-filling dates at a 5-day interval in Google Sheets:
Autofill by Months
To autofill by months in Google Sheets, we follow the same methodology as we have seen in the last approach.
Step 1: Type in the first two dates of the series. This time, the dates will be a month apart.
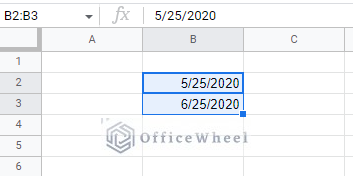
Make sure to keep the day and year values the same. Otherwise, they will be included in the autofill calculation.
Step 2: Select the values and use the fill handle to create a sequence of dates that increment by month.
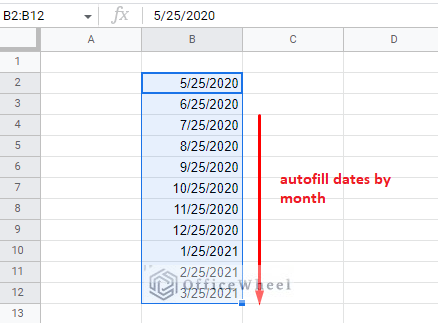
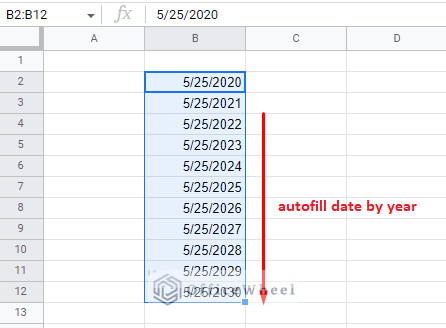
Autofill By Years
Again, to autofill dates by years, we follow the same methodology.
Step 1: Input the first two dates of the sequence 1 year apart.
Step 2: Select the two dates and use the fill handle down the row.
Double Click the Fill Handle to Autofill in Google Sheets
Consider a scenario where you have to autofill dates in Google Sheets over a hundred rows. Doing so by dragging the fill handle may be tedious. We need a more efficient method that involves no dragging.
While Google Sheets does not have the Fill command like Excel to automatically generate a sequence of dates, it does however have a trick up its sleeve incorporated within the fill handle. That is, autofill by double-clicking the fill handle.
Double click when the cursor turns into the plus (+) to autofill down a column in Google Sheets.
As you can see from the image above, this method has two conditions to work properly:
- It needs an adjacent column of values to work.
- The number of values of the adjacent column sets the limit of the autofill.
The different interval of date sequences will also work with this approach.
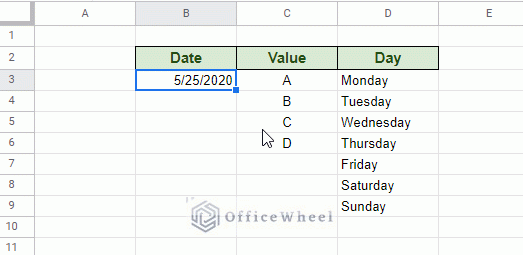
2. Autofill Sequential Days with Each New Entry in Google Sheets using Formula
Most built-in features like the fill handle of Google Sheets cannot handle conditional triggers. One such common scenario is to generate or autofill sequential dates whenever a user inputs a new entry in a column.
Like we see in this image:
To overcome this condition limitation, we must resort to formulas to autofill dates in Google Sheets. And we have some easy ones to work with. Let’s see how it’s done:
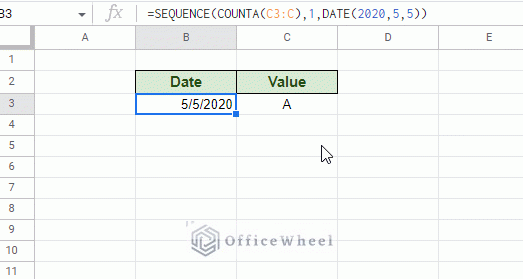
Step 1: To start off, we will use the SEQUENCE function. As the name states, this function will create a sequence of numbers according to the arguments stated:
SEQUENCE(rows, [columns], [start], [step])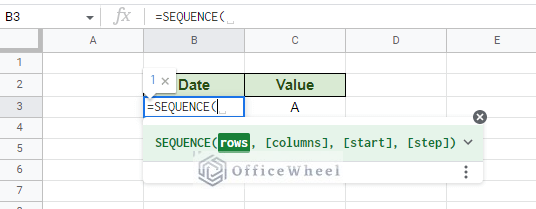
Step 2: Input the rows argument. For the formula, this will be in the form of a dynamic count. We will use the COUNTA function over the Value column of the dataset:
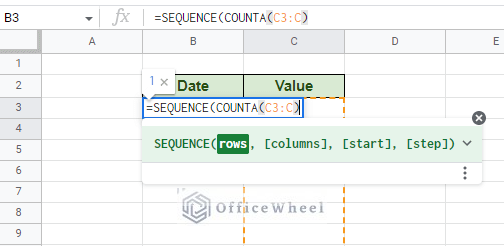
We have left the cell range open-ended (C3:C) to make the formula dynamic. This will allow the SEQUENCE function to automatically generate a number whenever a user inputs a new entry.
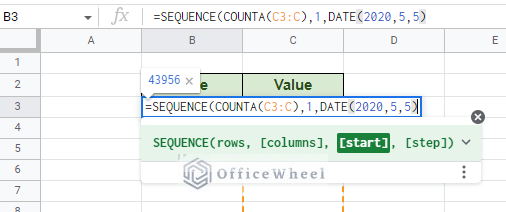
Step 3: The column argument will remain 1 since we want the output to be in a single column. But let’s bring our attention to the start argument.
We will give this value as our start date, which is implemented by the DATE function:
Step 4: Close parentheses and press ENTER. We will get the following output.
=SEQUENCE(COUNTA(C1:C),1,DATE(2020,5,5))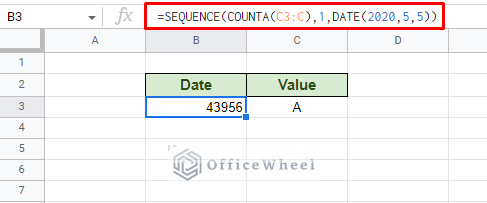
As you can see, the result is in the date-code format. This is how Google Sheets stores date values.
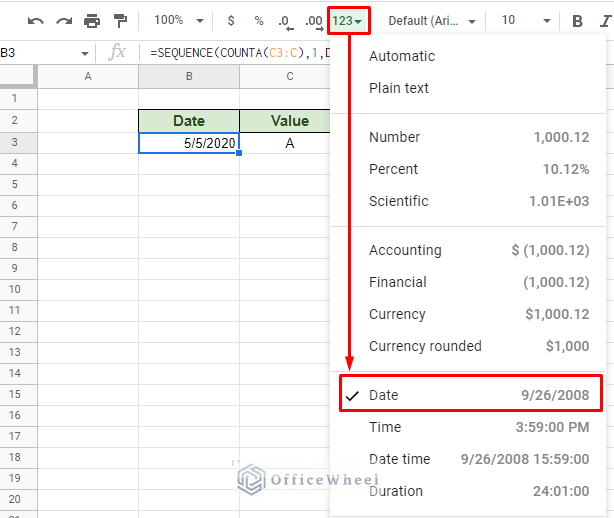
Step 5: Format the result column to a date format from the Toolbar.
The formula in action:
Autofill Formula Updated to Exclude Hidden Rows
Consider the following image:
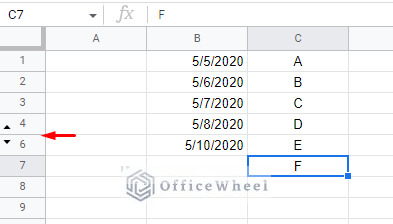
Here, one of the rows was hidden before adding new values to the column, this made the formula not only skip a row of data but also gave us one less date value.
We must take a few steps and update our formula to exclude these hidden or filtered rows in the formula.
Steps to Create the Formula
Step 1: We move the SEQUENCE formula to a separate column. We have chosen column F for the task.
=SEQUENCE(COUNTA(C1:C),1,DATE(2020,5,5))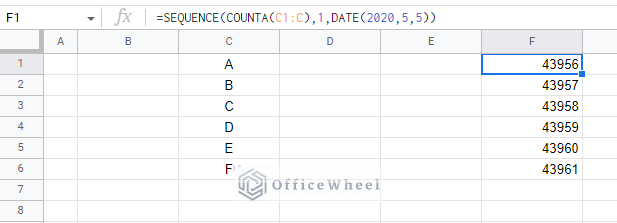
This formula will be updated to the following to exclude hidden cells:
=SEQUENCE(COUNTIF(D1:D,">0"),1,DATE(2020,5,5))Step 2: The crux of our formula lies in the creation of a helper column, which we did in column D:
=SUBTOTAL(103,C1)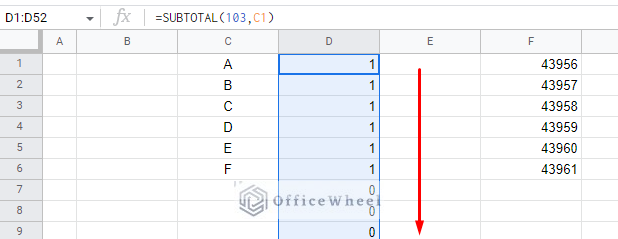
The 103 code is equivalent to COUNTA in the SUBTOTAL function. We must also manually apply this formula to the whole column. The advantage of using the SUBTOTAL function is that it will always return a value, even if the row is hidden (0).
Step 3: Apply the following formula in cell E1:
=FILTER(ROW(INDIRECT("B1:B"&COUNTA(C1:C))),INDIRECT("D1:D"&COUNTA(C1:C))>0)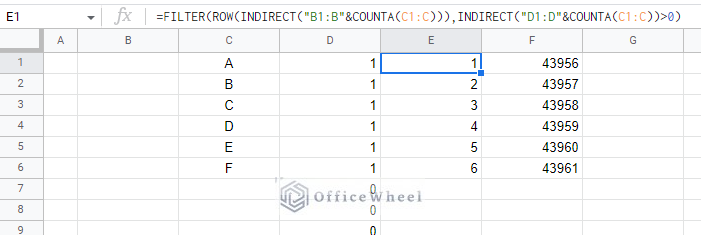
This function generates a serial according to the number of values in columns C and D.
By now, all the helper columns and formulas are in place and give us the desired values. It’s time to move on to creating the final formula in cell B1.
Step 4: To autofill a date with every new entry and excluding hidden or filtered rows, we will use the VLOOKUP function to retrieve and display the values calculated from the helper columns.
The base function has the following format:
=ArrayFormula(IFNA(VLOOKUP(ROW(B1:B),E1:F,2,0)))We will incorporate our helper columns of E and F as virtual columns as the range argument. Simply apply the formulas in the E1 and F1 cells separated by commas.
The final version:
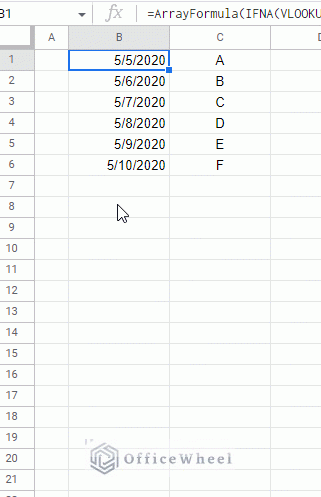
=ArrayFormula(IFNA(VLOOKUP(ROW(B1:B),{FILTER(ROW(INDIRECT("B1:B"&COUNTA(C1:C))),INDIRECT("D1:D"&COUNTA(C1:C))>0),SEQUENCE(COUNTIF(D1:D,">0"),1,DATE(2020,5,5))},2,0)))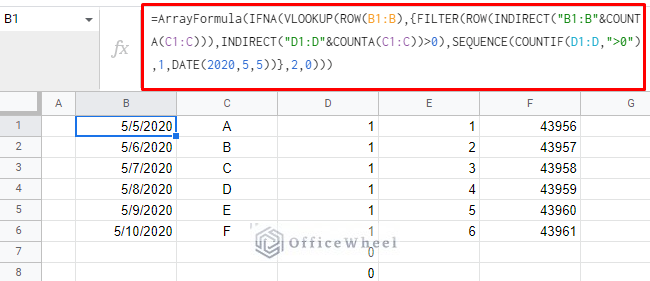
In action:
Limitations
As you may have noticed, the formula has a heavy reliance on the ROW function. This means that all our column values must start from the first row.
Heaving headers or starting from a different row will disrupt the ROW function output and give us the wrong result.
Making this function highly volatile and situational.
3. Using Google Apps Script to Autofill Date when a Cell is Updated in Google Sheets
So far, we ‘ve seen two approaches with two different limitations. Built-in features cannot handle user conditions and formulas are limited to situational use.
What if I said we could remove these limitations and autofill a date and time with every new data entry in Google Sheets?
Enter Google Apps Script.
This feature allows us to write a script to create a function that caters to our needs.
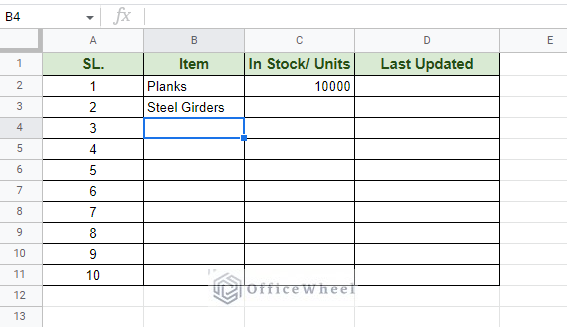
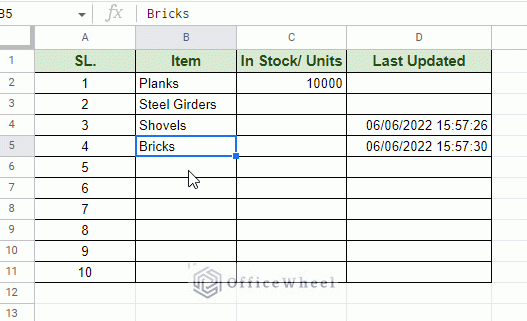
Consider the following dataset. Every time a user enters or updates a row, the Last Updated column will populate or update to the date and time when the row was changed.
Let’s see how we can do that with Apps Script:
Step 1: Navigate to the Apps Script option from the Extensions tab.
Extensions > Apps Script
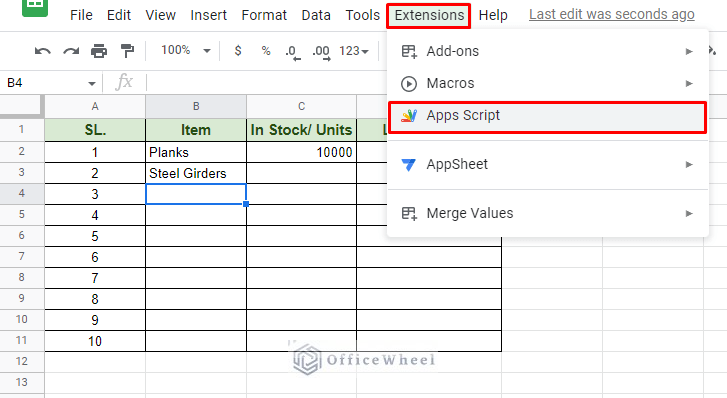
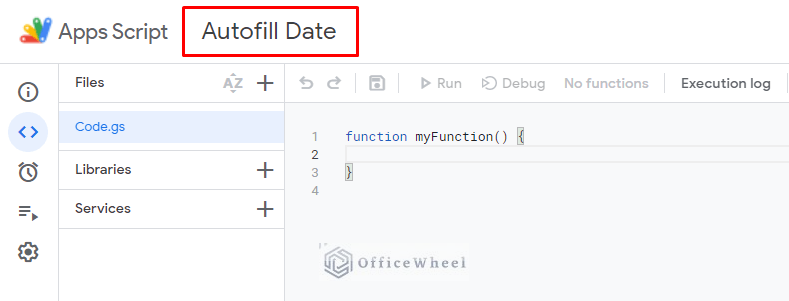
This will take you to the Apps Script window as a new window in your browser. Be sure to give your project a name.
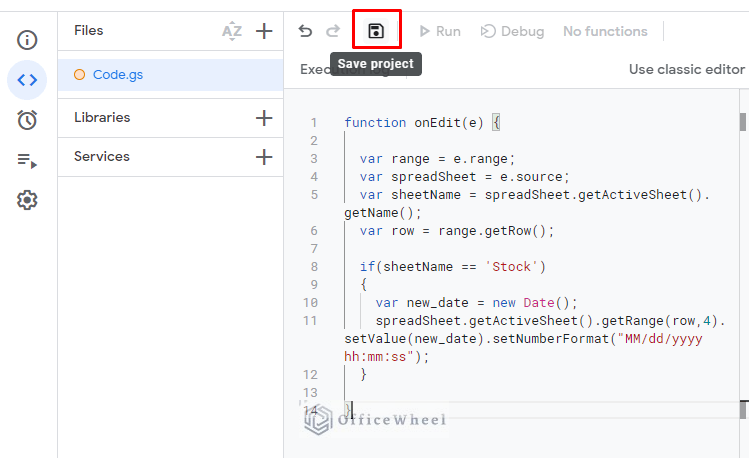
Step 2: Apply the following script:
function onEdit(e) {

  var range = e.range;
  var spreadSheet = e.source;
  var sheetName = spreadSheet.getActiveSheet().getName();
  var row = range.getRow();

  if(sheetName == 'Stock')
  {
    var new_date = new Date();
    spreadSheet.getActiveSheet().getRange(row,4).setValue(new_date).setNumberFormat("MM/dd/yyyy hh:mm:ss");
  }

}
Every time the user updates a row, the script triggers the onEdit function. The function generates the current date and time in the updated row and the 4th column. As stated in the getRange(row,4) of the Stock worksheet.
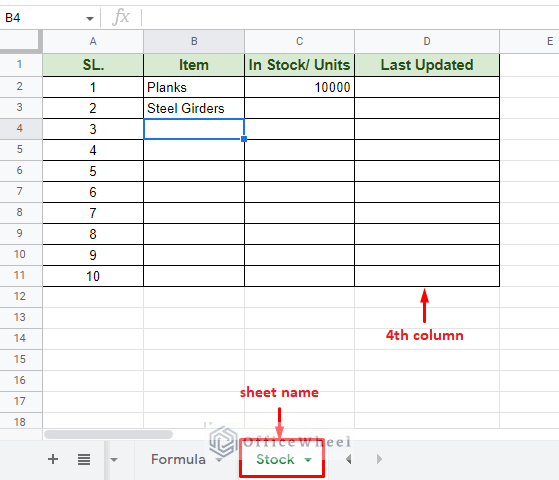
We input column number 4 as our Last Updated column is D, essentially the 4th column. If your date column is somewhere else, update accordingly.
Step 3: Click on Save project to apply then Run to execute.
The script in action:
Learn More: Autofill Date when a Cell is Updated in Google Sheets (3 Easy Ways)
Final Words
With that, we conclude all the ways we can use to autofill dates in Google Sheets. Different scenarios and outcomes can define what approaches a user can take, whether it be built-in features or formulas. But it is good to know that we can remove most limitations if we apply the proper script.
Feel free to leave any queries or advice you might have in the comments section below.