The ability to recognize and count non-empty cells in Google Sheets is very crucial if you are looking to avoid some silly errors. And today, we will be looking at just that.
We will go through some very easy methods and processes that can be incorporated at every level of spreadsheet tasks.
Let’s get started.
4 Ways to Count Non-Empty Cells in Google Sheets
1. Using the COUNTA Function
The first method we are going to look at uses the COUNTA function.
The syntax:
COUNTA(value1, [value2, ...])The function simply returns the count/number of the values in a given range. It is the perfect function for our topic today. Well, almost perfect.
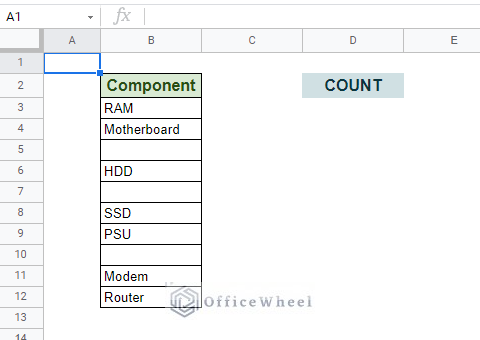
Let’s apply the COUNTA function in the following dataset:
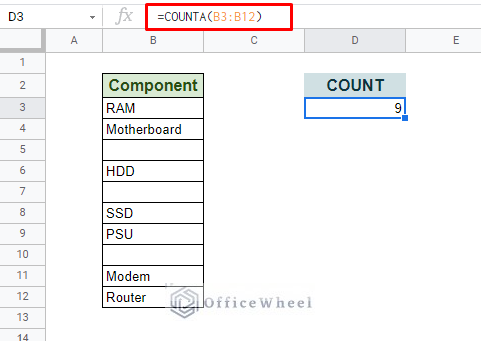
In cell D3, we apply the COUNTA formula with our list range B3:B12.
=COUNTA(B3:B12)But wait!
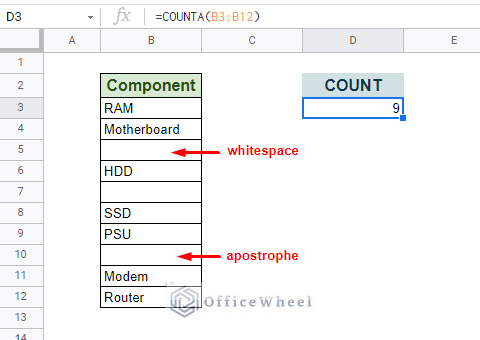
We see 7 items on our list, but the count is showing 9. Why is that?
The COUNTA function also counts invisible values like whitespaces and apostrophes (‘).
Bottom line: The COUNTA function counts all occurrences of values in the given range, making it a very good function if you want to find any hidden values within your dataset.
However, if you want to count only visible values, the next two methods should cover your needs
2. Using the COUNTIF Function
To overcome the limitations of the COUNTA function and count only visible values, we must add some conditions. What better way to do that than by using the COUNTIF function?
COUNTIF syntax:
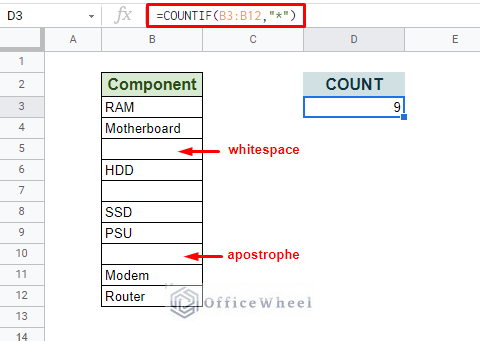
COUNTIF(range, criterion)For counting all non-blank cells in Google Sheets using COUNTIF:
=COUNTIF(B3:B12,"*")This count includes the whitespace and apostrophe values.
As you may have already guessed, it is the criterion part that we have to manipulate in order to give a proper count of only visible values.
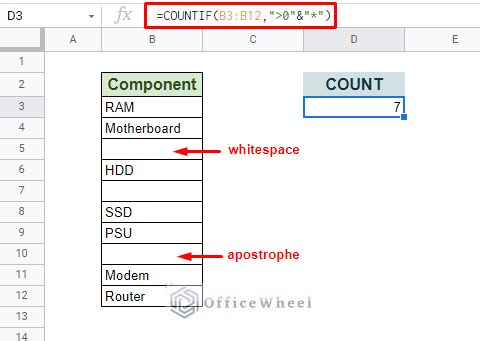
So, our new COUNTIF formula with updated criterion will be:
=COUNTIF(B3:B12,">0"&"*")Criterion Breakdown:
- “>0”: Considers anything that has a positive value, any cell that has a base value greater than 0.
- &: The ampersand operator is used to concatenate/connect the two conditions. It also operates in the AND logic in this case.
- “*”: The asterisk is a wildcard operator that denotes any characters in the cell.
Things to note about the COUNT formulas
- Given the nature of the COUNTA function, it is better to utilize it when the data is known to be perfect (no whitespaces or garbage values).
- The COUNTIF function is more versatile as it can take user-defined condition(s) to count occurrences. You can read more of that in our Using COUNTIF to Count Non-Blank Cells in Google Sheets article.
3. Count Non-Empty Cells using SUMPRODUCT Formula
The SUMPRODUCT function, coupled with LEN and TRIM functions, gives us a near-perfect solution to our problem of counting non-empty cells in Google Sheets.
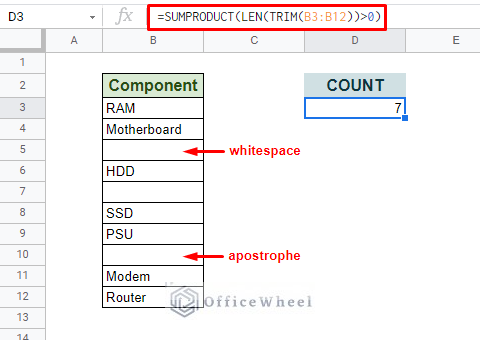
Our formula:
=SUMPRODUCT(LEN(TRIM(B3:B12))>0)Formula Breakdown:
- The TRIM function helps ignore any presence of whitespaces that may exist in a cell in the range.
- The LEN function condition counts any cell that has a length of characters greater than 0. It ignores any null strings or apostrophes (“).
- The SUMPRODUCT function counts all existing values in the range.
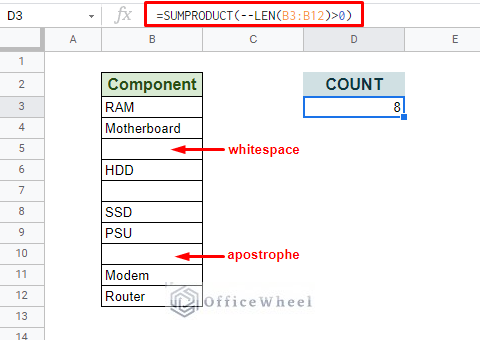
The following iteration of the SUMPRODUCT formula ignores the stray apostrophe (‘) in a blank cell. However, it takes into account any whitespaces.
=SUMPRODUCT(--LEN(B3:B12)>0)4. Count Non-Empty Cells From Google Sheets’ Task Bar
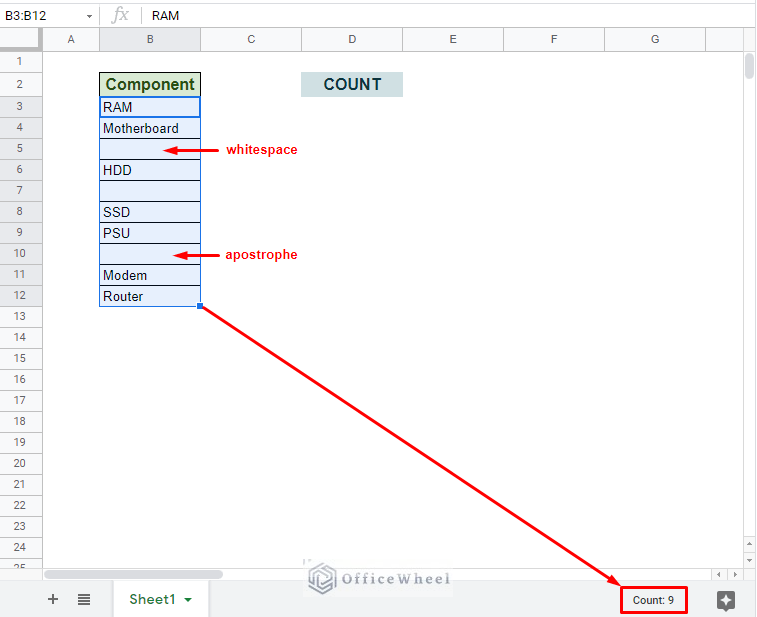
Google Sheets provides us with a very helpful way to count non-empty cells without having to use any formulas or functions within the worksheet. You can find this count at the bottom-right corner of the Google Sheets window or taskbar.
To see this count simply select/highlight the range of cells that you want to perform the count on:
We appreciate this method for its versatility. It is a direct alternative to the COUNTA function and can be also used as a reference to find whitespaces and apostrophes within a dataset.
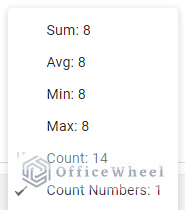
But there is more to this taskbar option than just counting the number of values:
Quite useful for many scenarios!
Final Words
With that, we have covered all the known ways in which we can count non-empty cells in Google Sheets. We hope that the methods we have discussed come in handy for your daily tasks. Feel free to leave a comment with any queries or advice you might have for us.


