In our guide today, we will see how to convert a date to month and year in Google Sheets. We have multiple approaches to this problem, each made easy, in terms of both understanding and accessibility, by Google Sheets.
How to Convert Date to Month and Year in Google Sheets
The crux of converting a date to any form rests on the fundamental formatting of values. Thankfully, Google Sheets has multiple ways that users can approach formatting data in their spreadsheets. One of which can be easily navigated from the Toolbar, while the other comes in the form of functions.
1. Convert or Format Date to Month and Year from the Google Sheets Toolbar
Using the Advanced Date and Time Feature (Custom Formatting)
Google Sheets provides its users with a hassle-free approach to format dates that can be performed right from the Toolbar.
You can navigate to it from the Format tab. Here you can find the “Custom date and time” option under the Number cluster. Format > Number > Custom date and time
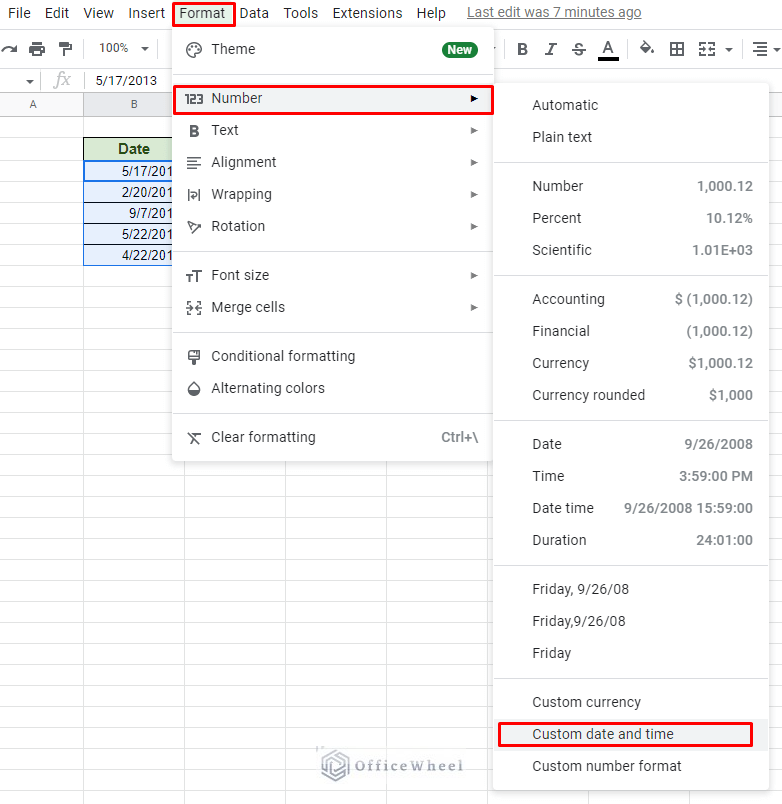
This should open the “Custom date and time formats” window.
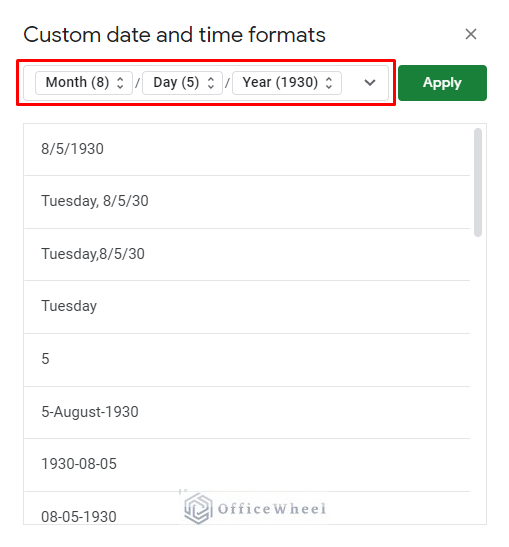
As you can see, the window already has a multitude of formats to choose from. Or you can use the top panel to create your own date formats.
This is what we will be taking advantage of in this article.
Convert Date to Month and Year from Toolbar
Our target today is to convert a date to month and year in a spreadsheet. So, back in the “Custom date and time formats” window, we can make some changes. Let’s look at the process step-by-step. To cover the fundamentals, we have started from a clean slate by deleting the existing format tabs:
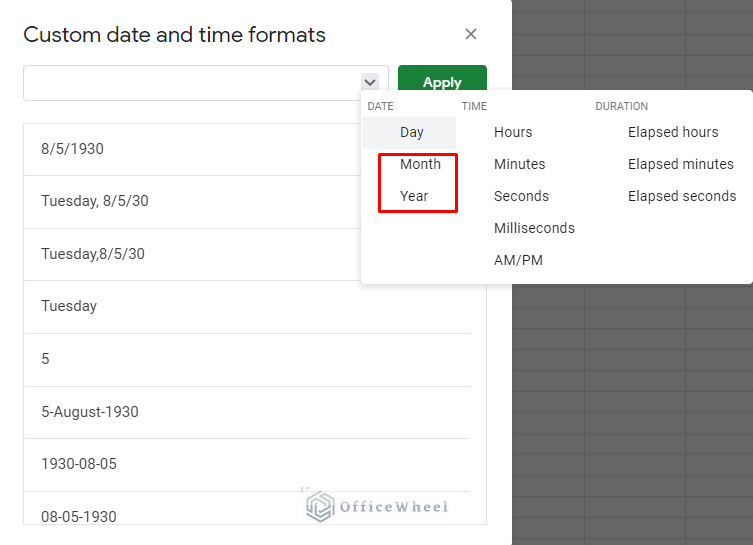
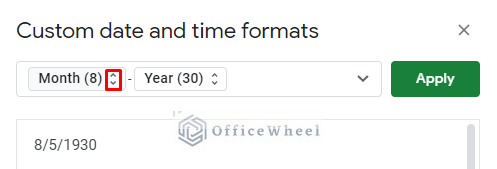
Step 1: Select the Month and Year tabs from the drop-down menu.
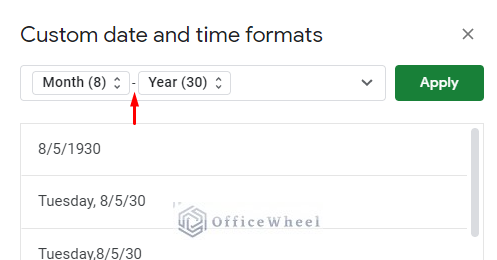
Step 2: It is always a good idea to put a delimiter between the different sections. A delimiter can be anything from the default slash (/), dash (-), comma (,), or even a whitespace combination. Simply type in the desired delimiter between the Month and Year tabs.
Step 3: Select the drop-down icon of the Month and Year tabs.
Here, choose the type of formatting or output you want.
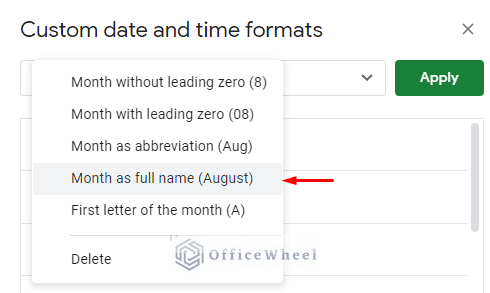
We are going for the full month name and full year value.
Step 4: Click Apply to convert the date to only month and year in Google Sheets.
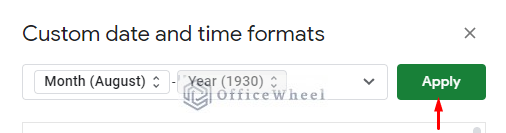
Our result:
Using this approach, you can transform a date into any format that you desire while keeping the base values intact.
Learn More: How to Format Date in Google Sheets (3 Easy Ways)
2. Convert or Format Date with a Formula to Month and Year
Google Sheets also provides its users with a plethora of date functions that can be utilized in multiple yet niche scenarios. Let’s have a look at some of these scenarios and how we can use some of the functions available.
I. How to Extract Month and Year from a Date in Separate Columns
For this section, we will look to extract the month and year values in Google Sheets separately and place them in columns. For this, we have quite the intuitive functions: MONTH and YEAR. Their purpose, as you might have already guessed, is to extract their corresponding values from a date.
Using the MONTH function:
=MONTH(B3)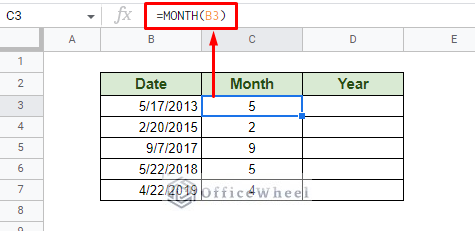
Using the YEAR function:
=YEAR(B3)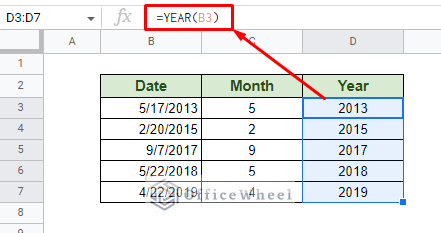
If you are looking to extract months by name, please see the next section.
II. Basic Date Format Formula of Google Sheets
Perhaps the best and easiest function to convert a date to any form in Google Sheets is by using the TEXT function.
TEXT(number, format)
The fundamental purpose of the TEXT function is to take a number and convert it to a text or string in a user-defined format. With the date being a number, this function is perfect for converting them into something else.
Note, however, that the TEXT function always has its results in text format. Meaning that the resultant date or any output will no longer be a numerical value. This means that numerical calculations like sorting and arithmetic will no longer be possible.
On the other hand, the TEXT function has a multitude of text codes used in the format field to format dates in any way the user requires. These are:
Day
- D or DD: Returns the day number of the month. DD will always return two digits. E.g., 02 or 15.
- DDD: Returns the shortened day name of the date. E.g., Mon or Tue.
- DDDD: Returns the full name of the day. E.g., Monday or Tuesday
Month
- M or MM: Returns the month number. MM will always return two digits. E.g., 06 or 11.
- MMM: Returns the shortened month name of the date. E.g., Feb or Aug.
- MMMM: Returns the full name of the month. E.g., February or August
Year
- Y or YY: Returns the last two digits of the year. E.g., 05 or 15.
- YYY or YYYY: Returns all four digits of the year. E.g., 2005 or 2015.
Learn More: How to Convert Date to String in Google Sheets (An Easy Guide)
That said, let’s see how we can use this function.
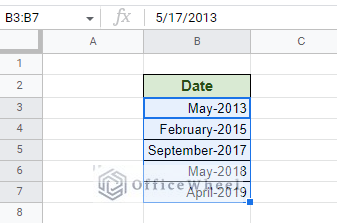
Convert Date to Month and Year Using a Formula
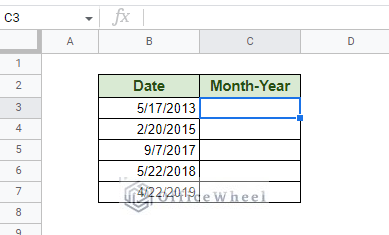
Here, we have a column of date values. As you can see, the values are right-aligned by default. This means that these are numerical values and are in the correct format.
In the Month-Year column, we apply the following TEXT formula:
=TEXT(B3,"MM-YYY")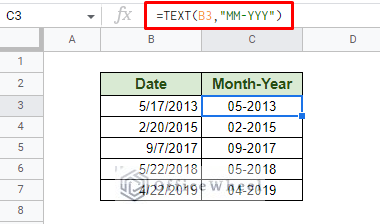
What we have just shown is a typical example. We can take advantage of the function’s text codes to present different Month-Year outputs:

Convert Date to Month and Year With a Single Formula
It is possible to present all the converted dates at once instead of applying a formula in each row. We can do this by considering a cell range reference for our formula instead of a single cell reference.
Here, we will select the Date column for the number field of the TEXT function. The range reference is open-ended (B3:B) to include the entirety of the column. To really make this formula work, we must use the ARRAYFORMULA function to present all the data.
Our formula:
=ArrayFormula(TEXT(B3:B,"MMM-YYYY"))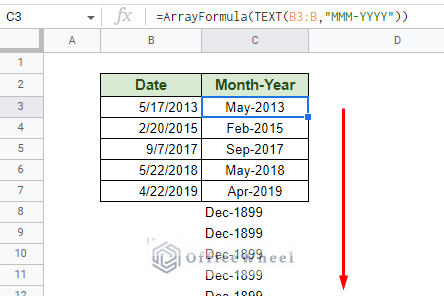
Since we used an open-ended range, the formula considers the blank cells in the column as well. To control and remedy this issue we have to include a condition with the IF function.
Our updated formula looks like this:
=ArrayFormula(IF(B3:B="",,TEXT(B3:B,"MMM-YYYY")))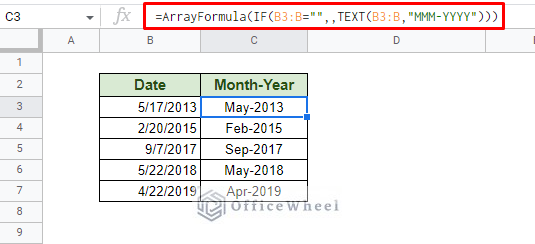
While the final formula looks big, remember that it only covers a single cell and also automatically and dynamically pulls data from the given range. This is a huge advantage when it comes to working with large datasets.
III. Using the EOMONTH Function to Convert Date to Month and Year in Google Sheets
As we mentioned before when introducing the TEXT function, the resultant conversion of date to month and year will no longer be numerical, barring it from being used in any number calculations.
But a promising alternative presents itself that will help us retain the date’s numerical value and also allow us to extract the month and year. This is with the help of the EOMONTH function.
EOMONTH(start_date, months)
Combining this function with simple formatting learned in method 1 of this article, will allow us to convert a date to any desired format keeping its value intact.
To begin, we simply type in the following formula in cell C3:
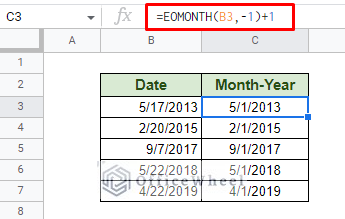
If you have used EOMONTH before, you should already know that this function returns the last date of the month by default. For 5/17/2013 it will be 5/31/2013.
With EOMONTH(B3,-1), the function returns the last date of the previous month. The result will be 4/30/2013.
Adding +1 to the last date of the previous month returns the first date of the current month. The result is 5/1/2013. That is the result you see in the image.
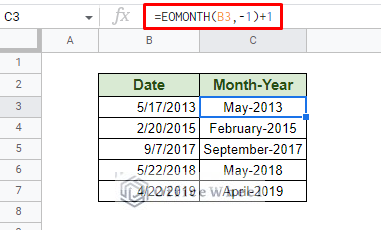
All that remains is to convert the resultant date to only show Month and Year. You can take any formatting approach for this. We have used the approach we have shown in method 1 of this article.
Why did we use this approach?
Firstly, the EOMONTH function does not change the base value of the date even after conversion, at least for the month and year values. It is still numerical and can be used in calculations, like sorting.
Secondly, we do not require the value of the day from our date for converting a date to month and year. So, leaving it at 1 has no consequences. Since the values of month and year are correctly extracted by EOMONTH, we simply need to convert them to our desired format ignoring the day.
Note that this method can also be used with ARRAYFORMULA and IF to present all values with a single function. The formula syntax is the same as the one with the TEXT function. Just remember to change the date format afterwards.
=ArrayFormula(IF(B3:B="",,EOMONTH(B3:B,-1)+1))Final Words
That concludes our simple guide to converting a date to month and year in Google Sheets. Custom formatting can always be a go-to approach when it comes to only presenting certain date values. Whereas functions present the users with a creative touch to better customize their outputs.
Feel free to leave any queries or advice you might have for us in the comments section below.